
TL;DR
Soundproofing a closet rig isn’t about endless foam. It’s about strategic placement, sealing leaks, and ensuring proper ventilation. A well-set closet can be an effective, silent workspace.
Ever tried to record in your closet and ended up with a boxy, echoey mess? You’re not alone. Many creators think that just slapping foam on the walls will solve everything. Acoustic Dampening, Placement, and the “Rig in the Closet” Setup But the truth is, soundproofing is more about where you put your gear, sealing every crack, and controlling heat—more than just adding foam.
This guide breaks down the real tricks behind making a closet into a quiet, functional rig. You’ll learn why placement beats foam, how to stop sound leaks, and how to keep your machine cool without turning it into an oven. Ready to turn that noisy closet into a peaceful workspace? Let’s go.
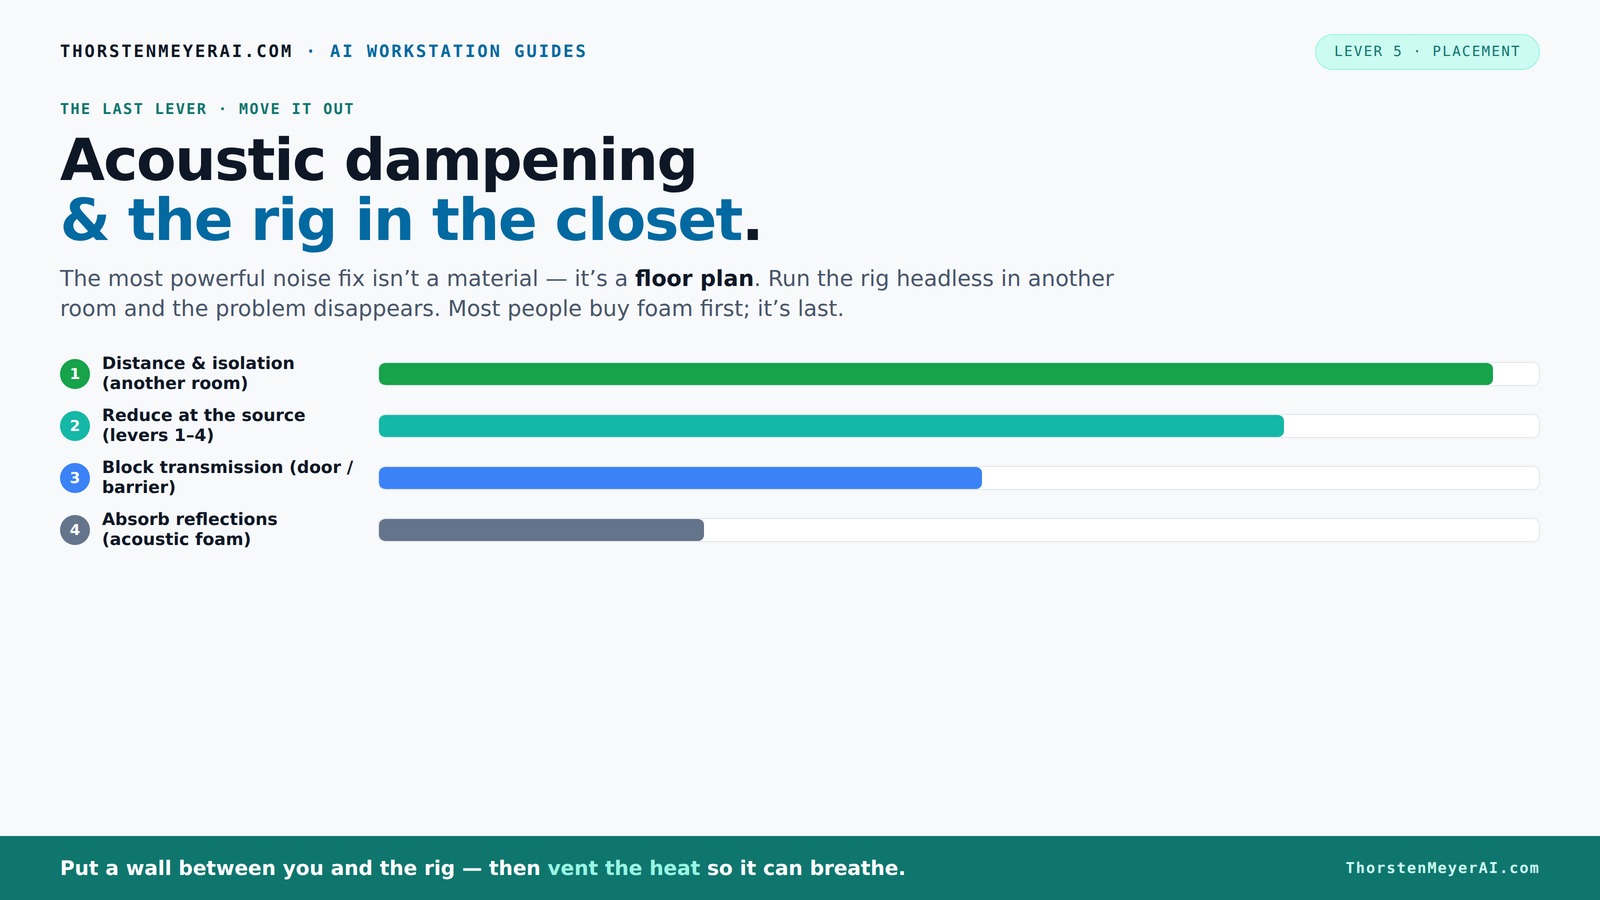
Acoustic dampening
& the rig in the closet.
The most powerful noise fix isn’t a material — it’s a floor plan. A rig you can’t hear because it’s in another room beats any amount of foam. Tap the approaches in Part 1 to see what actually works.
(another room)
(levers 1–4)
(door / barrier)
(acoustic foam)
Contain the noise, not the heat
Key Takeaways
- Sealing gaps and leaks makes a 70-80% difference in sound isolation, far more effective than foam alone.
- Placement of your mic, reflection points, and door treatment are the most impactful ways to improve sound quality in a closet.
- A closet rig needs ventilation—passive vents or quiet exhaust fans prevent overheating while maintaining silence.
- Bass traps help control low-frequency muddiness but are less critical in very small spaces unless low-end buildup is severe.
- Layered solutions—sealing, adding mass, absorption—deliver the best results for a quiet, effective closet setup.

Focusound 52 Pack Acoustic Foam Panels 1" x 12" x 12" Sound Proof Foam Panles Soundproofing Noise Cancelling Wedge Panels for Home Office Recoding Studio with 300PCS Double-Side Adhesive
Soundproofing - Acoustic foam panels triangular grooves structure for better noise absorption, helps to reduce and absorb unwanted...
As an affiliate, we earn on qualifying purchases.
As an affiliate, we earn on qualifying purchases.
Why Foam Alone Won’t Silence Your Closet — The Real Secrets to Soundproofing
Foam is great for reducing echo inside your closet, but it’s terrible at stopping sound from escaping. Think of foam like a soft sponge—it absorbs reflections but doesn’t block noise. If you want to keep sound in or out, you need barriers, sealing, and mass.
For example, a thin foam panel might cut your echo down by 50%, but sound can still leak through gaps, cracks, and the door. That’s why sealing gaps with weatherstripping and adding drywall or mass can block 80% of sound transmission, according to research. This is critical because even small leaks or openings can significantly undermine your efforts, leading to persistent noise escape or intrusion. The tradeoff is that adding mass and sealing can be more labor-intensive and costly than simply placing foam, but the results in sound isolation are far superior. Understanding these differences helps you prioritize what truly makes a difference in your setup.

Audimute Soundproofing Acoustic Door Seal Kit - Door Sweep and Seal - (Large Size)
Includes (2) Door Seals (3/16" x 1/2" x 50') and (1) Door Sweep (1/2" x 1.5" x 25').
As an affiliate, we earn on qualifying purchases.
As an affiliate, we earn on qualifying purchases.
The Top 3 Placement Tricks to Make Your Closet Sound Better
- Position your mic and source carefully. Place your mic in the quietest, least reflective spot—preferably away from hard surfaces. Use reflection filters or hang soft material behind the mic to tame room reflections. Why does this matter? Because even the best acoustic treatment can't fix poor placement. Proper positioning reduces the need for excessive damping and prevents your recordings from picking up unwanted room noise or echoes, which can compromise clarity and professional quality.
- Focus on reflection points. Treat the wall behind your mic, the ceiling above, and the side walls that bounce sound your way. Use small, dense panels or foam at these key points for maximum effect. You can learn more about acoustic treatment strategies. These points are where sound waves bounce directly into your microphone, so controlling them minimizes room coloration and leakage. The tradeoff is that over-treating can make your space feel cluttered or dampen desired sound. The key is strategic placement—target only the most reflective surfaces for efficient use of materials.
- Don’t forget the door. Seal gaps around the door with weatherstripping or draft stoppers. For more tips, visit this guide on soundproofing. Even a small crack can leak sound into your living space, ruining your quiet setup. Sound leaks through these small openings can be surprisingly significant because they act as acoustic loopholes, allowing noise to escape or enter with little resistance. Proper sealing ensures your sound stays contained, but it can be a challenge if the door is uneven or if the frame isn’t tight. The tradeoff involves balancing ease of sealing with the level of soundproofing desired.
havit HV-F2056 15.6"-17" Laptop Cooler Cooling Pad - Slim Portable USB Powered (3 Fans), Black/Blue
Ultra-Portable: Slim, portable, and light weight allowing you to protect your investment wherever you go
As an affiliate, we earn on qualifying purchases.
As an affiliate, we earn on qualifying purchases.
How to Seal Gaps and Stop Sound Leaks in Your Closet
Gaps are sneaky. They let sound escape through cracks, outlets, and gaps around the door. Sealing these is the easiest way to boost your soundproofing without pricey construction. But why does this matter? Because even small leaks can significantly reduce your overall sound isolation, making your efforts less effective. Sound escapes or enters through these tiny openings, undermining your entire setup, especially if you’re trying to record or practice quietly.
Start with weatherstripping around the door frame. Use acoustic caulk on any cracks or seams in the walls or ceiling. Find out more about soundproofing and insulation techniques. For outlets, install outlet gaskets or box them in with soundproof panels. These methods create a continuous barrier, preventing sound leakage and improving your overall effectiveness. The tradeoff is that sealing can be time-consuming, especially in irregular spaces, but the payoff in sound isolation is well worth it. Remember, the goal is to eliminate as many leaks as possible to maximize your soundproofing investment.

Soundrise DOMES Isolation Pads - Sound Dampening & Anti-Vibration Silicone Feet - Audio Isolation Feet for Subwoofers, Speakers & Turntables - Peel & Stick, Durable Class-A Silicone, Non-Slip (4-Pack)
Support up to 55 pounds with each 1.25" sound isolation pad! Absorb vibrations to minimize annoying buzzing sounds...
As an affiliate, we earn on qualifying purchases.
As an affiliate, we earn on qualifying purchases.
Should You Put a Tight Seal on Your Closet? Or Ventilate It?
Putting a machine in a sealed closet traps heat, which can cook your hardware. The key is ventilation. Why? Because heat buildup can lead to hardware overheating, causing performance issues or even damage over time. Proper ventilation allows hot air to escape and cooler air to circulate, maintaining safe operating temperatures. But balancing this with soundproofing is tricky: vents can be a pathway for sound leaks if not designed carefully.
Use passive vents or ducted exhaust fans—quiet models work best. For additional cooling solutions, see payment processing and operational strategies. These allow hot air out and cooler air in, preventing overheating while maintaining some level of sound isolation. The tradeoff involves choosing between maximum soundproofing and effective cooling. Often, a combination of small, baffled vents or duct silencers can help, but it requires careful planning. For example, adding a small exhaust fan in a closet rig kept temperatures stable for 24-hour operation, preventing throttling and noise spikes. The goal is a balanced approach—cool enough to protect your gear, quiet enough to keep your workspace silent.
The DIY Closet Rig: What You Need to Make It Work
A good closet rig combines a quality mic, a sturdy stand, reflection control, and ventilation. It’s about making the space work for you, not against you. Why does this matter? Because a well-planned setup minimizes unwanted noise, echoes, and heat buildup, leading to better recordings and a more comfortable environment. Skipping essential elements can result in poor sound quality or equipment failure, which wastes time and effort.
Here’s a quick checklist:
- Microphone and stand or boom arm
- Reflection filter or portable acoustic panels
- Sealing materials for gaps
- Ventilation setup (passive or active)
- Cable management and power access
For example, I used a simple reflection filter plus weatherstripping around the door, and my voice sounded crystal clear—without disturbing the rest of the house. Proper setup ensures your space is optimized for sound quality and comfort, making your recording sessions more efficient and enjoyable.
Bass Traps and Low-End Control in a Small Space — Do You Need Them?
In tiny closets, low frequencies can bounce and create a boomy sound. Bass traps help absorb these low-end waves, but their effectiveness depends on room size and placement. Why does this matter? Because low-frequency buildup can muddy your recordings, making voices or instruments sound less clear and natural. In small spaces, these frequencies reflect more easily, creating uneven sound fields.
In a closet, bass traps in the upper corners can tame some boominess, but don’t expect miracles. They’re most useful if your voice or instrument produces a lot of low frequencies or if you notice muddiness. The tradeoff is that bass traps can be bulky and sometimes expensive, so their use should be targeted. For example, adding a small bass trap in the closet corner reduced muddiness in recordings, making voice clarity much better. Proper placement and understanding your room’s acoustic signature are key to maximizing their benefit.
Your Best Bet: Combining Sealing, Absorption, and Mass
The most effective soundproofing approach in a closet is a layered one. Seal gaps tightly, add mass (like drywall or dense panels), and absorb reflections with foam or panels. Why? Because each layer addresses different aspects of sound transmission. Sealing prevents leaks, mass blocks sound from passing through barriers, and absorption reduces echoes and room coloration. The tradeoff is that combining these methods requires more effort and investment but results in a much higher level of sound isolation. For example, installing a second drywall layer with damping compound, combined with sealing leaks, cut sound transmission by over 80%. It’s a big step up from just foam, offering a comprehensive solution that tackles multiple pathways for sound escape or ingress.
Frequently Asked Questions
Can I just add foam panels and call it a day?
Foam panels help reduce echo inside your closet but do little to block sound escaping. For true isolation, sealing gaps, adding mass, and proper placement matter much more.How do I stop sound from leaking through the door?
Use weatherstripping and draft stoppers around the door frame. Thick, dense curtains or a door sweep can also help cut down on leaks, making your closet much quieter.Do I need bass traps in a small closet?
Bass traps can help control low-frequency buildup and reduce boominess. In very small spaces, they’re less critical but still useful if you notice muddiness in your recordings.Is it better to vent or fully seal my closet?
Venting prevents overheating and keeps your hardware cool, which is crucial for long sessions. Use quiet exhaust fans or passive vents to balance cooling with soundproofing.What’s the most effective way to make my closet soundproof on a budget?
Seal all gaps with weatherstripping, add some dense mass like drywall, and place soft materials at reflection points—these simple steps give the biggest bang for your buck.Conclusion
Soundproofing a closet isn’t about endless foam; it’s about smart placement, sealing every crack, and managing heat. When you combine these tactics, your closet becomes a quiet, reliable workspace—without breaking the bank or disturbing the neighbors.
Remember: a well-sealed, ventilated closet rig can outperform a messy, echoey room any day. Your best move? Focus on sealing leaks and managing heat—then enjoy your peaceful, productive space.