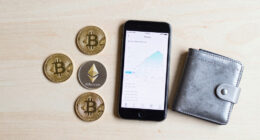

This guide explains how to set up a hardware wallet for storing cryptocurrencies securely. It is intended for users with basic knowledge of cryptocurrencies but new to hardware wallets. Completing this process ensures your assets are protected from hacking and theft.

Tangem Crypto Wallet Pack of 2 – Cold Storage Hardware Wallet for Bitcoin, Ethereum, NFTs & Altcoins
- ✔ Number of Wallets: 2
- ✔ Supported Blockchains: 90
- ✔ Supported Coins & Tokens: 14,100+

Ledger Nano X Crypto Wallet Signer – Bluetooth Enabled, Onyx Black
- ✔ Connectivity: Bluetooth
- ✔ Compatibility: iOS
- ✔ Color: Onyx Black

Ledger Flex Crypto Wallet Securely Manage All Your Digital Assets
- ✔ Color: Blue
- ✔ Screen Size: 2.8 inches
- ✔ Display: Gorilla Glass touchscreen
Difficulty: Intermediate | Time: 20-30 minutes
What You’ll Need
Tools & Materials:
- Hardware wallet device (e.g., Ledger, Trezor)
- Computer or smartphone with internet access
- USB cable (if required)
- Paper and pen for recovery seed backup
Knowledge:
- Basic understanding of cryptocurrencies
- Familiarity with digital security concepts
Ensure your device is purchased from an official source to avoid tampering. Have a secure location to store your recovery seed.

TANGEM Crypto Wallet Pack of 2 – Trusted Cold Storage Hardware Wallet for Bitcoin, Ethereum, NFTs & Altcoins – 100% Offline Crypto Cold Wallet
Proven security at scale: Over 9 years and millions of cards issued with no known remote hacks, while...
As an affiliate, we earn on qualifying purchases.
Tangem Crypto Wallet Pack of 2 – Cold Storage Hardware Wallet for Bitcoin, Ethereum, NFTs & Altcoins
The Tangem Crypto Wallet stands out for its **military-grade security** and weather-resistant design, supporting over 14,100 coins across 90 blockchains. Unlike Bluetooth-enabled wallets, Tangem emphasizes offline cold storage, making it ideal for long-term preservation. Its **waterproof and shockproof build** adds durability, and its easy management—without cables or batteries—simplifies secure storage. However, it lacks a built-in display or on-device interface, meaning transactions require physical access and manual management. Compared to Ledger Nano X, Tangem sacrifices convenience for enhanced durability and offline security, making it best suited for those prioritizing asset safety over frequent trading.
Pros:
- High security with military-grade chip and offline storage
- Supports NFTs and DeFi tokens, broad compatibility
- Weather-resistant, waterproof, and shockproof design
- Easy to manage without cables or batteries
Cons:
- Requires physical access for transactions
- No built-in display or interface
- Limited to hardware wallet functionality, not a software solution
Best for: Long-term holders seeking durable, offline cold storage
Not ideal for: Active traders requiring quick access or frequent transactions
Bottom line: Best for long-term security-focused storage, sacrificing convenience for durability.
“Best for long-term security-focused storage, sacrificing convenience for durability.”
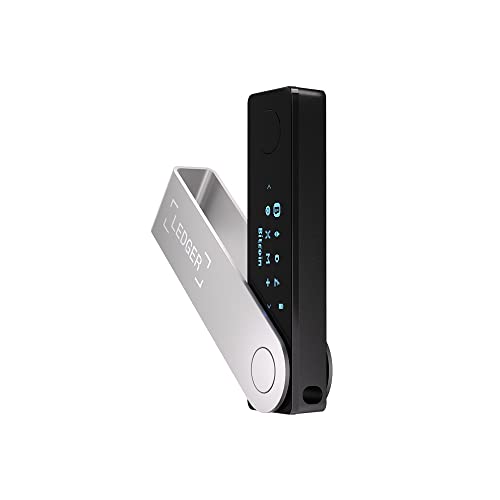
Ledger Nano X Crypto Wallet Signer - Securely Manage All Your Crypto Assets with This Bluetooth Enabled Classic - Onyx Black
Effortlessly build your crypto portfolio via the all in one Ledger Wallet app: buy, sell, send, receive, swap,...
As an affiliate, we earn on qualifying purchases.
Ledger Nano X Crypto Wallet Signer – Bluetooth Enabled, Onyx Black
The Ledger Nano X is the most versatile in our lineup, supporting over 15,000 coins and tokens. Its **Bluetooth connectivity** allows seamless management via iOS devices, making it a strong choice for users who want to trade, stake, or track assets on the go. The Nano X also offers secure backup options and robust authentication, but it is more vulnerable to physical damage if mishandled, and its color may vary from the images. While its extensive coin support and mobile integration make it very user-friendly, it comes at a higher price point, and the battery life details are somewhat vague. Compared with Tangem, it sacrifices some durability for broader usability and interactive features.
Pros:
- Supports over 15,000 cryptocurrencies
- Bluetooth connectivity for mobile management
- Secure backup and authentication features
- Compact and portable design
Cons:
- Product color may vary from pictures
- Requires careful handling to avoid scratches
- Battery life details are not specified
Best for: Active users managing diverse assets on mobile devices
Not ideal for: Long-term holders who prefer offline storage without daily interactions
Bottom line: Ideal for mobile-centric users wanting broad coin support and Bluetooth convenience.
“Ideal for mobile-centric users wanting broad coin support and Bluetooth convenience.”
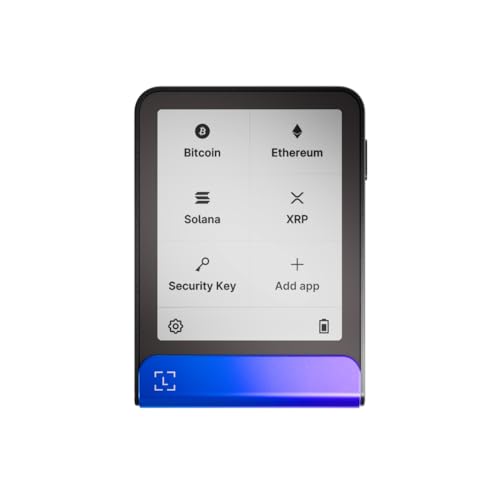
Ledger Flex Crypto Wallet Securely Manage All Your Digital Assets
Simply & securely take control of your digital assets and identity with the all-in-one Ledger Wallet crypto app...
As an affiliate, we earn on qualifying purchases.
Ledger Flex Crypto Wallet Securely Manage All Your Digital Assets
The Ledger Flex introduces a high-resolution 2.8-inch Gorilla Glass touchscreen, making it easier to navigate and manage assets directly on the device. Its support for over 15,000 cryptocurrencies, combined with features like NFC, Bluetooth, and a Secure Element, positions it as a premium option for active users. The touchscreen simplifies NFT showcases and DeFi exploration, but the setup process can be complex for beginners, and its higher price reflects its advanced capabilities. Compared to Ledger Nano X, the Flex offers a more intuitive interface but demands a bit more technical familiarity. It is best suited for users who want a balance of security, visual management, and active asset engagement.
Pros:
- Secure offline storage with backup options
- High-resolution Gorilla Glass touchscreen
- Supports NFTs and DeFi features
- NFC and Bluetooth connectivity
Cons:
- Requires pairing with a compatible app for full functionality
- Setup may be complex for beginners
- Higher price compared to basic wallets
Best for: Active traders and NFT enthusiasts seeking ease of use
Not ideal for: Crypto newcomers or those on a strict budget
Bottom line: Best for active users wanting an intuitive interface and comprehensive asset management.
“Best for active users wanting an intuitive interface and comprehensive asset management.”
As an Amazon Associate we earn from qualifying purchases.
Before You Start
Read through all instructions carefully before beginning. Make sure your device is fully charged or connected to power if necessary. Disable any screen recording or screen sharing to prevent seed theft. Avoid using public Wi-Fi during setup.
Step-by-Step Instructions
Step 1: Unpack and inspect your hardware wallet
Remove the device from its packaging. Check that the device is sealed and has no physical damage. Confirm that the included accessories match your device’s package list.
Tip: Avoid using a device that appears tampered with or damaged. Purchase only from authorized sellers.
Check: The device powers on and displays the welcome or setup screen.
Step 2: Connect your hardware wallet to your computer or smartphone
Use the provided USB cable or wireless method (if supported) to connect the device to your computer or mobile device. Ensure a stable connection.
Tip: Use a USB port directly on your computer rather than a hub to prevent connection issues.
Check: The device is recognized by the setup software or app and displays its interface.
Step 3: Initialize the device and create a new wallet
Follow the on-screen prompts to start the setup process. Select ‘Create New Wallet’ or similar option. Set a PIN code following the device’s instructions.
Tip: Choose a strong, unique PIN that you can remember but others cannot guess. Avoid common patterns.
Check: The device confirms the PIN and displays options for seed phrase generation.
Step 4: Write down the recovery seed phrase
The device will generate a 12-, 18-, or 24-word recovery seed. Write each word down in order on the provided paper, ensuring clarity. Do not take a photo or store digitally.
Tip: Write slowly and double-check each word. Store the paper in a secure, offline location, such as a safe.
Check: You have accurately recorded the entire seed phrase in the correct order.
Step 5: Verify the recovery seed phrase
Follow the prompts on the device to confirm your seed phrase by selecting the words in the correct order.
Tip: Double-check your written record before confirming to avoid errors later.
Check: The device confirms the seed phrase is correct and proceeds to finalize setup.
Step 6: Install wallet software or app
Download the official wallet management app or software from the manufacturer’s website. Install it on your computer or smartphone.
Tip: Use official sources only to avoid malware or counterfeit apps.
Check: The app recognizes your hardware wallet and displays the main interface.
Step 7: Connect your wallet to the software and set up accounts
Open the wallet app and connect your device. Follow prompts to add cryptocurrency accounts or addresses for different assets.
Tip: Label each account for clarity and organization.
Check: Your accounts appear with correct addresses, ready to receive and send crypto.
Common Mistakes to Avoid
- Not securely recording the recovery seed — Write the seed on paper and store it offline in a safe location. Never store digitally or share with others.
- Using unofficial or tampered hardware wallets — Purchase only from official sellers and verify packaging seals before opening.
- Choosing weak PIN codes — Select a PIN that is long, complex, and unique. Avoid common patterns or easily guessable numbers.
Troubleshooting
Problem: Device not recognized by computer or app
Solution: Try reconnecting the device, using a different USB port, or restarting your computer. Verify driver installation if needed.
Problem: Error during seed phrase verification
Solution: Double-check your written seed words for accuracy. Restart the setup process if necessary.
Problem: Lost or damaged recovery seed
Solution: If you lose your seed, assets may be unrecoverable. Always keep the seed in a secure, offline location when first recorded.
What Success Looks Like
You have successfully set up the hardware wallet, created a secure PIN, recorded and verified the recovery seed, and added your cryptocurrency accounts. The device displays your addresses and is ready to send or receive crypto assets securely.
Next Steps
Regularly update your wallet firmware if updates are available. Use your hardware wallet for all transactions to maintain security. Store your seed securely and review your backup periodically. When not in use, disconnect the device and keep it in a safe place.
Frequently Asked Questions
Can I use the hardware wallet on multiple devices?
Yes, most hardware wallets can be connected to different computers or smartphones using compatible software or apps. Follow manufacturer instructions for secure switching.
What should I do if I forget my PIN?
If you forget your PIN, you will need to reset the device using your recovery seed. This will wipe the device, so ensure your seed is securely stored before proceeding.
Is it safe to connect my hardware wallet to a public computer?
It is not recommended. Use a secure, private device to prevent malware or hacking risks. Always verify the device and software authenticity before use.
Can I store multiple cryptocurrencies on one hardware wallet?
Yes, most hardware wallets support multiple cryptocurrencies and tokens. Add accounts for each asset in the wallet software.